안녕하세요?
오늘은 웹 스크래핑 (web scrapping)에 대해 알아보겠습니다.
웹 스크래핑이 왜 필요할까요? 대학 과제나 회사 업무에서 간혹 기초 자료가 필요한 경우가 있습니다.
이럴때 보통 구글 검색을 통해 자료를 찾았어도 만약 그 양이 방대할 경우 일일이 시간 낭비할 수 없습니다.
이럴 때 필요한게 웹 스크래핑인데요, 오늘은 자바스크립트 정확히는 NodeJS로 알아 보겠습니다.
일단 웹 스크래핑 목적이 있어야 되는데요. 2020년 현대기아차 판매실적을 알아 보겠습니다.
국내에서 판매되는 국산차와 수입차 통계 실적을 잘 보여주는 곳이 있습니다.
http://auto.danawa.com/auto/?Work=record
2020년 12월 판매실적 | 자동차 백과 : 다나와 자동차
2020년 12월 국산차/수입차 판매량, 판매실적
auto.danawa.com
다나와자동차 사이트의 문구를 보시면 꽤 정확한 자료를 통계내고 있는 거 같습니다.
" 다나와자동차의 판매실적은 한국자동차산업협회(KAMA)와 한국수입자동차협회(KAIDA)의 공식 자료를 가공하여 제공됩니다.
전월 판매실적은 국산차는 1일, 수입차는 15일경 업데이트됩니다. (국산 차 상세 트림별 판매실적은 매월 25일 추가 업데이트)
원본 자료와 다나와 자동차의 차량 구분 체계가 달라 수치가 일부 다를 수 있습니다. (버스/상용차/특장차, 연료 구분 등등)"
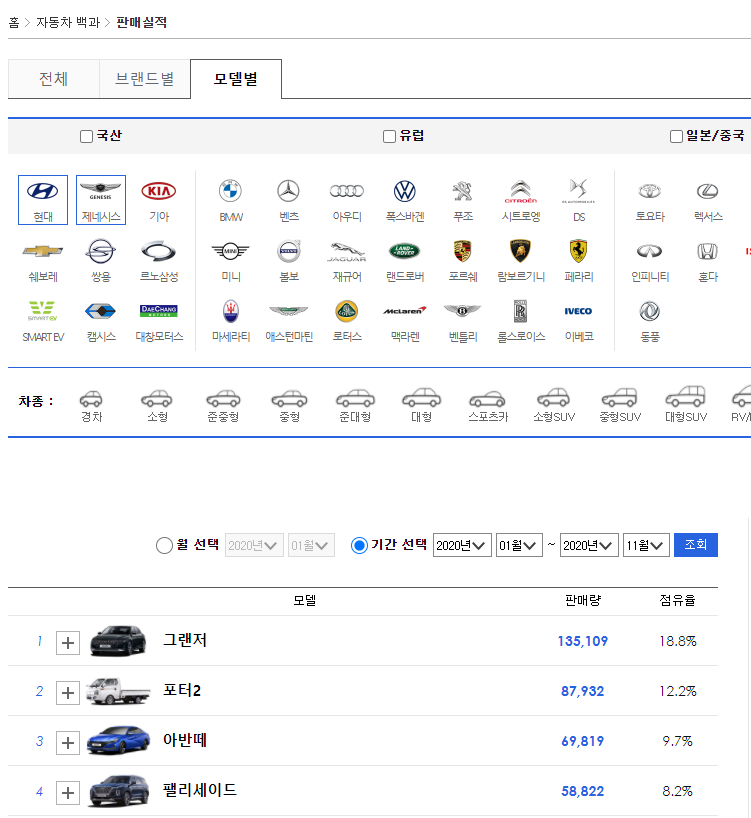
일단 사이트 사용법을 봐야 되는데, 아래 스크린샷처럼 나옵니다.

여기서 현대차 판매실적을 알아볼려고 할려면 아래 로고를 클릭하면 됩니다.
로고는 2개이상 클릭이 가능합니다.
현대차 판매실적을 알아볼려고 하니까 현대로고랑 제네시스 로고를 클릭해 봅시다.
아래 스크린샷처럼 2020년 11월 판매실적이 디폴트로 나옵니다.
1년치를 다 보고 싶으면 라디오버튼의 기간선택에서 2020년 1월에서 2020년 11월까지 선택하고 조회하면 우리가 원하는 판매 실적이 나옵니다.

이제 웹 스크래핑을 위한 HTML 소스파일을 보겠습니다.
일단 그랜저 부분만 살펴보겠습니다.
<table class='recordTable model' cellspacing='0'>
<caption>모델별 판매실적</caption>
<colgroup>
<col class='check'>
<col class='rank'>
<col class='more'>
<col width='*'>
<col class='count'>
<col class='rate'>
</colgroup>
<thead>
<tr>
<th colspan='3'> </th>
<th scope='col'>모델</th>
<th scope='col'>판매량</th>
<th scope='col'>점유율</th>
</tr>
</thead>
<tbody>
<tr>
<!-- <td><input type='checkbox' name='compItemCk' value='record_3737' title='그랜저' brand='303' disabled></td>-->
<td> </td>
<td class='rank'>1</td>
<td>
<button type='button' class='viewMore' model='3737' name='sub_model_sel'>
<span class='screen_behind'>등급별 보기</span>
</button></td>
<td class='title'>
 <a href='/newcar/?Work=estimate&Model=3737'>
                                <img src='http://autoimg.danawa.com/photo/3737/model_200.png' onerror="imageError(this, 'model_200_100.png')" alt='그랜저'>
                                그랜저
                            </a>
</td>
<td class='num'>135,109</td>
<td>18.8%</td>
</tr>
<tr class='sub model_3737' name='sub_model'>
<td class='col' colspan='3'></td>
<td class='title'><span>가솔린 2.5</span></td>
<td class='num'>63,398</td>
<td ></td>
</tr>
<tr class='sub model_3737' name='sub_model'>
<td class='col' colspan='3'></td>
<td class='title'><span>가솔린 2.4 하이브리드</span></td>
<td class='num'>32,128</td>
<td ></td>
</tr>
<tr class='sub model_3737' name='sub_model'>
<td class='col' colspan='3'></td>
<td class='title'><span>LPG 3.0</span></td>
<td class='num'>16,641</td>
<td ></td>
</tr>
<tr class='sub model_3737' name='sub_model'>
<td class='col' colspan='3'></td>
<td class='title'><span>가솔린 3.3</span></td>
<td class='num'>11,294</td>
<td ></td>
</tr>
<tr class='sub model_3737' name='sub_model'>
<td class='col' colspan='3'></td>
<td class='title'><span>트림별 판매량 분류 예정</span></td>
<td class='num'>11,648</td>
<td ></td>
</tr>
<tr class='sub total model_3737 ' name='sub_model'>
                        <td class='col' colspan='3'></td>
                        <td class='total_title'>총합계 : <span class='total_cont'><span>휘발유 <strong>74,692</strong></span><span>LPG <strong>16,641</strong></span><span>하이브리드 <strong>32,128</strong></span></span></td>
                        <td class='total_num'>135,109</td>
						<td></td>
					</tr>
"그랜저" 라는 이름은
<a href='/newcar/?Work=estimate&Model=3737'>
<img src='http://autoimg.danawa.com/photo/3737/model_200.png' onerror="imageError(this, 'model_200_100.png')" alt='그랜저'>
그랜저
</a>
a tag 밑에 있습니다.
그리고, "총 판매량"은
<tr class='sub total model_3737 ' name='sub_model'>
<td class='col' colspan='3'></td>
<td class='total_title'>총합계 : <span class='total_cont'><span>휘발유 <strong>74,692</strong></span><span>LPG <strong>16,641</strong></span><span>하이브리드 <strong>32,128</strong></span></span></td>
<td class='total_num'>135,109</td>
<td></td>
</tr>
css 클래스가 total_num으로 되어 있습니다.
위에서는 135,109라고 되어 있습니다.
자, 웹 페이지에 우리가 원하는 자료가 다 있습니다.
이제 본격적인 코드를 만들어 보겠습니다.
일단 NodeJS를 이용해서 테스트 환경을 만들어 보겠습니다.
mkdir scraping-car-sales
cd scraping-car-sales
npm init -y
npm install axios cheerio --save
npm 모듈은 axios랑 cheerio 를 설치했는데요, axios는 웹 페이지 fetch을 위한 모듈이고, cheerio는 NodeJS에서 유명한 스크래핑 모듈입니다.
cheerio github 링크는 아래와 같습니다.
https://github.com/cheeriojs/cheerio
cheeriojs/cheerio
Fast, flexible, and lean implementation of core jQuery designed specifically for the server. - cheeriojs/cheerio
github.com
일단 위에 나와있는 다나와자동차의 HTML 소스파일을 스크래핑하는 코드를 작성해 봅시다.
const axios = require('axios');
const cheerio = require('cheerio');

let url = "http://auto.danawa.com/auto/?Work=record&Tab=Model&Brand=undefined,303,304&Month=2020-01-00&MonthTo=2020-11-00";

axios.get(url)
    .then(html => {
        const $ = cheerio.load(html.data);

        var nameArr = [];
        $('table.recordTable')
            .find('tbody tr')
            .find('td.title')
            .find('a')
            .each((i, el) => {
                nameArr.push(
                    $(el).text()
                        .replace(/\n/g, '')
                        .replace(/ /g, '')
                );
            });

        console.log(nameArr);
    })
    .catch(error => console.error(error));

console.log("End of Main Program");

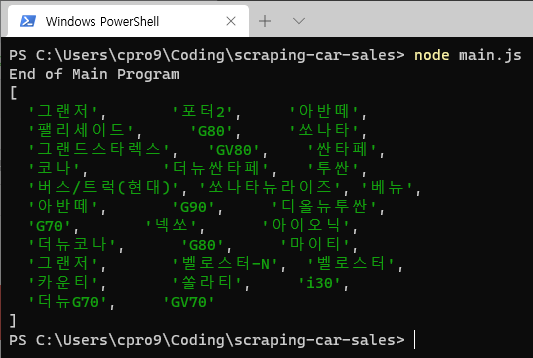
우리가 원하는 결과가 나왔습니다. 순서대로 "그랜저", "포터2", "아반떼" 등등
웹페이지 순서대로 결과가 나왔습니다.
이제 코드 설명을 해보겠습니다.
const axios = require('axios');
const cheerio = require('cheerio');

let url = "http://auto.danawa.com/auto/?Work=record&Tab=Model&Brand=undefined,303,304&Month=2020-01-00&MonthTo=2020-11-00";

axios.get(url)
    .then(html => {
axios랑 cheerio를 로드하고 우리가 원하는 주소를 url이란 변수에 저장했습니다.
그 다음 axios.get(url)로 fetch를 시작하고 그 다음 Promise를 처리하는 .then()으로 넘어갑니다.
.then()안을 살펴 볼까요?
.then(html => {
        const $ = cheerio.load(html.data);
axios가 리턴하는 것을 html이란 이름으로 지정했고, 우리가 원하는 소스페이지는 html 객체에서 data란 부분입니다.
그리고 cheerio.load(html.data)에 그 소소페이지를 넣고 받은 객체를 $로 할당 했습니다.
jQuery 객체랑 비슷합니다.
다음 코드로 넘어가 볼까요?
var nameArr = [];
        $('table.recordTable')
            .find('tbody tr')
            .find('td.title')
            .find('a')
            .each((i, el) => {
                nameArr.push(
                    $(el).text()
                        .replace(/\n/g, '')
                        .replace(/ /g, '')
                );
            });
cheerio로 웹스크래핑할 때 tag랑 css 클래스를 지정하면 원하는 위치의 정보를 쉽게 찾을 수 있습니다.
그래서 우리가 찾을 "그랜저" 이름은 상위 html 태그가 table입니다. 그 table은 css 클래스가 recordTable입니다.
그래서 $('table.recordTable')이라고 했습니다. 그러면 이 table tag 전체가 선택됩니다.
그럼 이 table 밑에서 더 나아가야 할려면 다음과 같이 하면 됩니다.
.find('tbody tr')
.find('td.title')
.find('a')
table 밑에 tbody 밑에 tr 밑에 css클래스가 title인 td를 선택하고 그 밑에 a tag를 고른 겁니다.
이 a 태그에 우리가 원하는 "그랜저"라는 이름이 있습니다.
$('table.recordTable')
            .find('tbody tr')
            .find('td.title')
            .find('a')
            .text()
위에서 처럼 하면 cheerio는 상기 조건에 맞는 모든 조건을 다 스크래핑하는데요 우리가 원하는 차종이 다 나옵니다.
그래서 우리는 each 함수를 써서 모든 차종에 대해 간단한 문자열 치환 함수를 써서 깨끗하게 만들고 그것을 임시 배열에 저장합니다.
.each((i, el) => {
                nameArr.push(
                    $(el).text()
                        .replace(/\n/g, '')
                        .replace(/ /g, '')
                );
            });
each 함수는 i (인덱스 넘버), el (해당 객체)를 인자로 갖는데요.
자바스크립트 map 함수랑 비슷합니다.
우리가 원하는 모든 차종이 el 객체애 할당되서 LOOP를 도는 겁니다.
그래서 우리는 nameArr이란 배열 변수를 만들어 놓고 여기다 우리가 원하는 차종 한개씩 추가하는 원리입니다.
$(el)
    .text()
    .replace(/\n/g, '')
    .replace(/ /g, '')
위 코드는 each 함수의 각가의 el 객체로 반환되는 우리의 모든 차종 이름을 깔끔하게 만드는 작업입니다.
순수하게 웹스크래핑하면 '\n', 그리고 공백문자등 찌꺼기가 많은데요, 이걸 다 공백 '' 으로 만드는 치환(replace) 함수입니다.
마지막으로 그 배열을 출력하면 배열의 각각이 하나의 차종 이름이 되는 것을 보실 수 있습니다.
이제, 판매 대수를 웹 스크래핑 해볼까요?
같은 논리로 td tag에 css 클래스 total_num 만 찾으면 됩니다.
그 결과는 아래와 같은 코드가 될 겁니다.
const axios = require('axios');
const cheerio = require('cheerio');

let url = "http://auto.danawa.com/auto/?Work=record&Tab=Model&Brand=undefined,303,304&Month=2020-01-00&MonthTo=2020-11-00";

axios.get(url)
    .then(html => {
        const $ = cheerio.load(html.data);

        var nameArr = [];
        $('table.recordTable')
            .find('tbody tr')
            .find('td.title')
            .find('a')
            .each((i, el) => {
                nameArr.push(
                    $(el).text()
                        .replace(/\n/g, '')
                        .replace(/ /g, '')
                );
            });

        var numberArr = [];
        $('table.recordTable')
            .find('tbody tr.total')
            .find('td.total_num')
            .each((i, el) => {
                numberArr.push(
                    $(el).text()
                        .replace(/\n/g, '')
                        .replace(/ /g, '')
                );
            });

        console.log(nameArr);
        console.log(numberArr);
    })
    .catch(error => console.error(error));

console.log("End of Main Program");

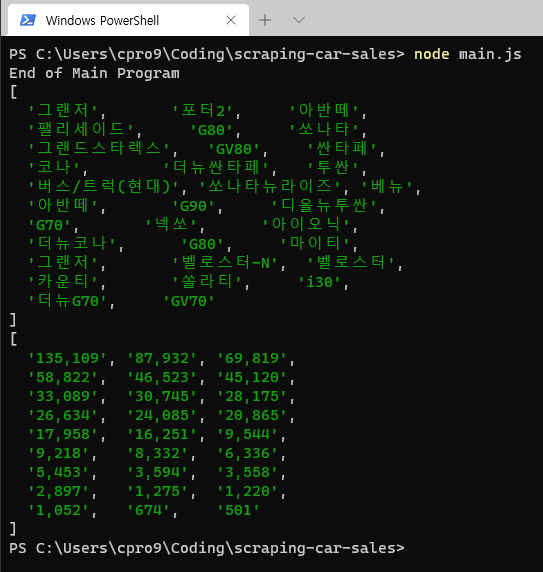
판매대수도 우리가 원하는 배열에 잘 저장되었습니다.
그런데 뭔가가 이상하죠? 개수가 안맞습니다.
배열의 length를 출력해서 보겠습니다.

숫자가 안맞습니다.
차종명은 32개인데 판매대수 개수는 27개입니다.
뭔가가 이상한데 원인을 찾아볼까요?
차종이랑 판매대수 숫자를 비교하면
"버스/트럭(현대)"가 차종 이름은 있는데 판매대수가 안보입니다.
왜 그런지 HTML 소스코드를 살펴 봅시다.
<tr>
                        <!-- <td><input type='checkbox' name='compItemCk' value='record_9999' title='버스/트럭 (현대)' brand='303' disabled></td>-->
                        <td> </td>
                        <td class='rank'>13</td>
                        <td></td>
                        <td class='title'>
                            <a href='/newcar/?Work=estimate&Model=9999'>
                                <img src='http://autoimg.danawa.com/photo/9999/model_200.png' onerror="imageError(this, 'model_200_100.png')" alt='버스/트럭 (현대)'>
                                버스/트럭 (현대)
                            </a>
                        </td>
                        <td class='num'>20,792</td>
                        <td>2.9%</td>
                    </tr>
"버스/트럭 (현대)" 차종은 판매대수의 css 클래스가 "total_num"이 아닌 그냥 "num"입니다.
그 외 "카운티", "더 뉴 G70", "GV70" 모두 css 클래스가 "total_num"이 아니고 그냥 " num"으로 나옵니다.
자! 여기서 난관에 부딪혔습니다. 어떻게 해결해 나가야 할까요?
다음 편에서 다른 방법을 찾아 보도록 하겠습니다.
'코딩 > Javascript' 카테고리의 다른 글
| [JS-기초편] 1.소개 (0) | 2020.12.13 |
|---|---|
| 자바스크립트 웹 스크래핑 맛보기 - 2편 (0) | 2020.12.13 |
| 자바스크립트 fetch를 이용한 비동기 및 동기방식 프로그래밍의 이해 (0) | 2020.12.11 |
| 자바스크립트의 덧셈 연산 완벽 분석 (0) | 2020.12.09 |
| 3편, 카카오톡 웹 버전 만들기 (React, Material-UI) (13) | 2020.12.07 |

