안녕하세요?
얼마전부터 Tailwind CSS 강좌를 이어 가고 있는데요.
처음에는 어려웠지만 계속 도전해 보니까 예전에 배웠는 HTML + CSS 지식이 다시금 살아나서 좋았습니다.
Tailwind CSS 의 장점은 본인의 상상이 그대로 UI로 이어진다는데 있는거 같습니다.
앞으로 Tailwind CSS를 이용한 나만의 UI 라이브러리를 구축해 볼까 합니다.
그래서 지난번에 만들었던 Top Navbar 글의 후속편인데요.
https://cpro95.tistory.com/531
Tailwind css 반응형 메뉴 navbar 만들기
안녕하세요? 오늘은 지금까지 쭉 관심있게 지켜본 Tailwind CSS 에 대해 공부해 볼까 합니다. Tailwind CSS 가 최근 가장 핫한 CSS 유틸인데요. React 로 UI 디자인은 보통 Material-UI, Bootstrap, Ant Design 등..
cpro95.tistory.com
기존에는 상단 반응형 Navbar 를 만들었다면 이번에는 왼쪽 Sidebar와 상단 Navbar를 동시에 만들어 보겠습니다.
먼저 완성형 작품을 보실까요?
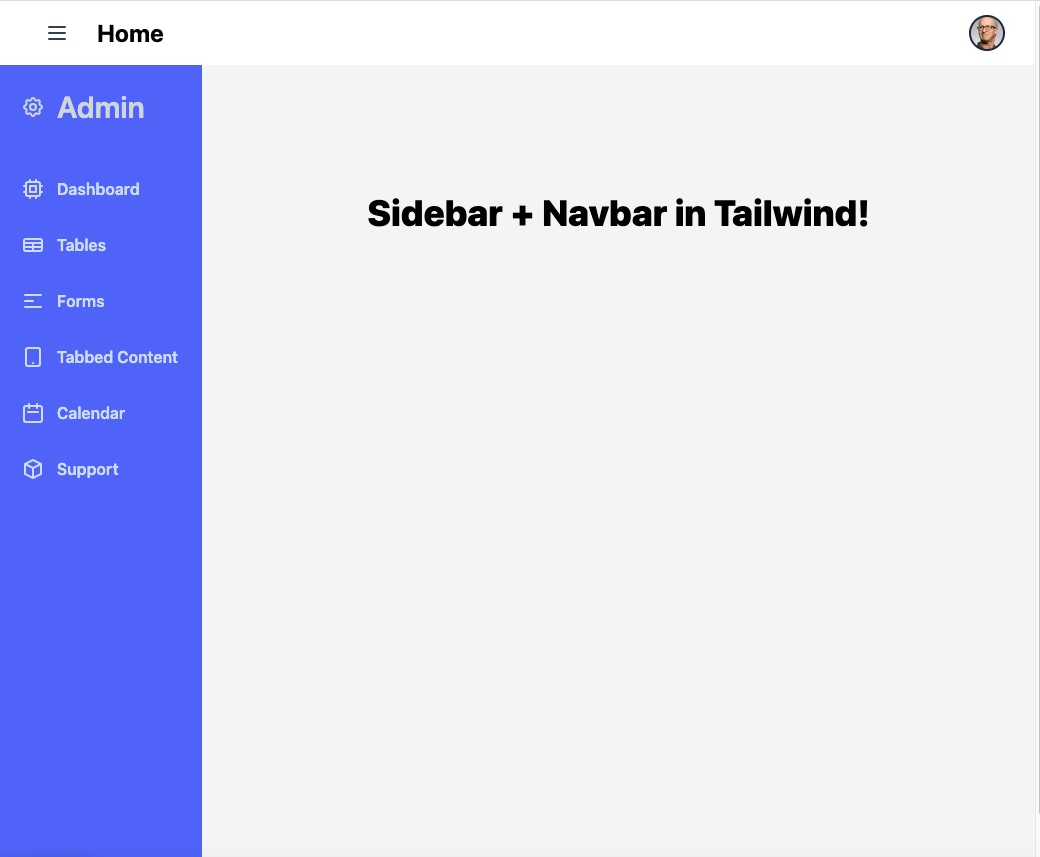
깔끔하네요.
개인적으로 파란색이 보기 좋네요.
완성된 반응형 모습을 동영상으로 캡쳐했는데 한번 볼까요?
모바일 버전으로 바뀌면 사이드바(SideNav)가 사라집니다.
그리고 모바일 버전용 Navbar가 나타나죠.
그럼 본격적으로 Tailwind CSS 강좌를 시작해 보도록 하겠습니다.
1. 기본 세팅하기
기본 세팅은 지난 시간에 만들었던 NextJS + Tailwind CSS 템플릿을 계속 이용할 생각입니다.
/pages/index.tsx
import Head from "next/head";

export default function Home() {
  return (
    <div>
      <Head>
        <title>Tailwind Sidebar + Navbar Tutorial</title>
        <link rel="icon" href="/favicon.ico" />
      </Head>

      {/* content goes here */}
      <div className="py-32 text-center">
        <div className="text-4xl font-extrabold">
          Sidebar + Navbar in Tailwind!
        </div>
      </div>
    </div>
  );
}
index.tsx는 바뀐게 없습니다.
/pages/_app.tsx
import "tailwindcss/tailwind.css";

import SideLayout from "../components/SideLayout";

function MyApp({ Component, pageProps }) {
  return (
    <SideLayout>
      <Component {...pageProps} />
    </SideLayout>
  );
}

export default MyApp;
_app.tsx는 바뀐게 있습니다.
Layout을 SideLayout 으로 바꿨습니다.
이유는 강좌를 계속 보시면 이해하실 수 있을 겁니다.
/components/SideLayout.tsx
import React from "react";
import SideNavbar from "./SideNavbar";

type Props = {
  children: React.ReactNode;
};

export default function SideLayout(props: Props) {
  return (
    <div className="w-full p-0">
      <SideNavbar>{props.children}</SideNavbar>
    </div>
  );
}
사이드바를 위한 SideLayout입니다.
props.children을 SideNavbar 컴포넌트에 전달해 주고 있습니다.
즉, props.children을 SideNavbar 안에서 처리하라는 얘기죠.
다음은 아이콘 준비입니다.
2. 아이콘 컴포넌트 준비
1편에서는 아이콘 SVG 파일은 그냥 Navbar.tsx 에 입혔는데요.
SVG 파일을 많이 쓴다 싶으면 컴포넌트로 만들어 놓는게 좋습니다.
코드를 짧게 만들어 주죠.
이번 강좌에서 쓸 Heroicons 에서 좋은거 몇개 뽑아봤습니다.
/components/Icons.tsx
import React from "react";

interface Props {
  class: string;
}

export function HamburgerIcon(props: Props) {
  return (
    <svg
      xmlns="http://www.w3.org/2000/svg"
      className={`h-6 w-6 ${props.class}`}
      fill="none"
      viewBox="0 0 24 24"
      stroke="currentColor"
    >
      <path
        strokeLinecap="round"
        strokeLinejoin="round"
        strokeWidth={2}
        d="M4 6h16M4 12h16M4 18h16"
      />
    </svg>
  );
}

export function ProfileIcon(props: Props) {
  return (
    <svg
      xmlns="http://www.w3.org/2000/svg"
      className={`h-6 w-6 ${props.class}`}
      fill="none"
      viewBox="0 0 24 24"
      stroke="currentColor"
    >
      <path
        strokeLinecap="round"
        strokeLinejoin="round"
        strokeWidth={2}
        d="M16 7a4 4 0 11-8 0 4 4 0 018 0zM12 14a7 7 0 00-7 7h14a7 7 0 00-7-7z"
      />
    </svg>
  );
}

export function SettingsIcon(props: Props) {
  return (
    <svg
      xmlns="http://www.w3.org/2000/svg"
      className={`h-6 w-6 ${props.class}`}
      fill="none"
      viewBox="0 0 24 24"
      stroke="currentColor"
    >
      <path
        strokeLinecap="round"
        strokeLinejoin="round"
        strokeWidth={2}
        d="M10.325 4.317c.426-1.756 2.924-1.756 3.35 0a1.724 1.724 0 002.573 1.066c1.543-.94 3.31.826 2.37 2.37a1.724 1.724 0 001.065 2.572c1.756.426 1.756 2.924 0 3.35a1.724 1.724 0 00-1.066 2.573c.94 1.543-.826 3.31-2.37 2.37a1.724 1.724 0 00-2.572 1.065c-.426 1.756-2.924 1.756-3.35 0a1.724 1.724 0 00-2.573-1.066c-1.543.94-3.31-.826-2.37-2.37a1.724 1.724 0 00-1.065-2.572c-1.756-.426-1.756-2.924 0-3.35a1.724 1.724 0 001.066-2.573c-.94-1.543.826-3.31 2.37-2.37.996.608 2.296.07 2.572-1.065z"
      />
      <path
        strokeLinecap="round"
        strokeLinejoin="round"
        strokeWidth={2}
        d="M15 12a3 3 0 11-6 0 3 3 0 016 0z"
      />
    </svg>
  );
}

export function SignoutIcon(props: Props) {
  return (
    <svg
      xmlns="http://www.w3.org/2000/svg"
      className={`h-6 w-6 ${props.class}`}
      fill="none"
      viewBox="0 0 24 24"
      stroke="currentColor"
    >
      <path
        strokeLinecap="round"
        strokeLinejoin="round"
        strokeWidth={2}
        d="M17 16l4-4m0 0l-4-4m4 4H7m6 4v1a3 3 0 01-3 3H6a3 3 0 01-3-3V7a3 3 0 013-3h4a3 3 0 013 3v1"
      />
    </svg>
  );
}

export function DashboardIcon(props: Props) {
  return (
    <svg
      xmlns="http://www.w3.org/2000/svg"
      className={`h-6 w-6 ${props.class}`}
      fill="none"
      viewBox="0 0 24 24"
      stroke="currentColor"
    >
      <path
        strokeLinecap="round"
        strokeLinejoin="round"
        strokeWidth={2}
        d="M9 3v2m6-2v2M9 19v2m6-2v2M5 9H3m2 6H3m18-6h-2m2 6h-2M7 19h10a2 2 0 002-2V7a2 2 0 00-2-2H7a2 2 0 00-2 2v10a2 2 0 002 2zM9 9h6v6H9V9z"
      />
    </svg>
  );
}

export function TablesIcon(props: Props) {
  return (
    <svg
      xmlns="http://www.w3.org/2000/svg"
      className={`h-6 w-6 ${props.class}`}
      fill="none"
      viewBox="0 0 24 24"
      stroke="currentColor"
    >
      <path
        strokeLinecap="round"
        strokeLinejoin="round"
        strokeWidth={2}
        d="M3 10h18M3 14h18m-9-4v8m-7 0h14a2 2 0 002-2V8a2 2 0 00-2-2H5a2 2 0 00-2 2v8a2 2 0 002 2z"
      />
    </svg>
  );
}

export function FormsIcon(props: Props) {
  return (
    <svg
      xmlns="http://www.w3.org/2000/svg"
      className={`h-6 w-6 ${props.class}`}
      fill="none"
      viewBox="0 0 24 24"
      stroke="currentColor"
    >
      <path
        strokeLinecap="round"
        strokeLinejoin="round"
        strokeWidth={2}
        d="M4 6h16M4 12h8m-8 6h16"
      />
    </svg>
  );
}

export function TabbedContentIcon(props: Props) {
  return (
    <svg
      xmlns="http://www.w3.org/2000/svg"
      className={`h-6 w-6 ${props.class}`}
      fill="none"
      viewBox="0 0 24 24"
      stroke="currentColor"
    >
      <path
        strokeLinecap="round"
        strokeLinejoin="round"
        strokeWidth={2}
        d="M12 18h.01M7 21h10a2 2 0 002-2V5a2 2 0 00-2-2H7a2 2 0 00-2 2v14a2 2 0 002 2z"
      />
    </svg>
  );
}

export function CalendarIcon(props: Props) {
  return (
    <svg
      xmlns="http://www.w3.org/2000/svg"
      className={`h-6 w-6 ${props.class}`}
      fill="none"
      viewBox="0 0 24 24"
      stroke="currentColor"
    >
      <path
        strokeLinecap="round"
        strokeLinejoin="round"
        strokeWidth={2}
        d="M8 7V3m8 4V3m-9 8h10M5 21h14a2 2 0 002-2V7a2 2 0 00-2-2H5a2 2 0 00-2 2v12a2 2 0 002 2z"
      />
    </svg>
  );
}

export function SupportIcon(props: Props) {
  return (
    <svg
      xmlns="http://www.w3.org/2000/svg"
      className={`h-6 w-6 ${props.class}`}
      fill="none"
      viewBox="0 0 24 24"
      stroke="currentColor"
    >
      <path
        strokeLinecap="round"
        strokeLinejoin="round"
        strokeWidth={2}
        d="M20 7l-8-4-8 4m16 0l-8 4m8-4v10l-8 4m0-10L4 7m8 4v10M4 7v10l8 4"
      />
    </svg>
  );
}
아이콘 컴포넌트는 그냥 SVG 코드를 리턴하는 역할만 합니다.
그럼, 전체적인 구조는 끝났으니까 SideNavbar.tsx 라는 Sidebar + Navbar 컴포넌트를 만들어 보겠습니다.
3. SideNavbar 전체적인 구조 작성
/components/SideNavbar.tsx
import React, { useState } from "react";

import {
  HamburgerIcon,
  ProfileIcon,
  SettingsIcon,
  SignoutIcon,
  DashboardIcon,
  TablesIcon,
  FormsIcon,
  TabbedContentIcon,
  CalendarIcon,
  SupportIcon,
} from "./Icons";

type Props = {
  children: React.ReactNode;
};

const SideNavbar = (props: Props) => {
  const bgColor: string = "bg-blue-500";
  const [menuToggle, setMenuToggle] = useState(true);
  const [profileToggle, setProfileToggle] = useState(false);

  return (
    <div>
      <nav className="bg-white">
        <div className="max-w-7xl mx-auto px-2 sm:px-6 lg:px-8">
          <div className="flex items-center justify-between h-16">
            {/* NavBar 상단 왼쪽 메뉴 */}
            <div>상단 왼쪽 메뉴</div>
            {/* NavBar 상단 오른쪽 메뉴 */}
            <div>상단 오른쪽 메뉴</div>
          </div>
        </div>
      </nav>

      {/* ===================================================================
          상단 Navbar 끝
          =================================================================== */}

      {/* 사이드 바 메인 */}
      <main className="flex bg-gray-100">
        {/* SideBar */}
        <aside className={`w-64 ${bgColor}`}>사이드바</aside>

        {/* Mobile Header & Nav */}
        <div className="w-full flex flex-col h-screen overflow-y-hidden">
          <header>모바일 메뉴</header>

          {/* props.children position here */}
          <slot>{props.children}</slot>
        </div>
      </main>
    </div>
  );
};

export default SideNavbar;
일단 전체적인 구조를 스크린샷으로 보겠습니다.
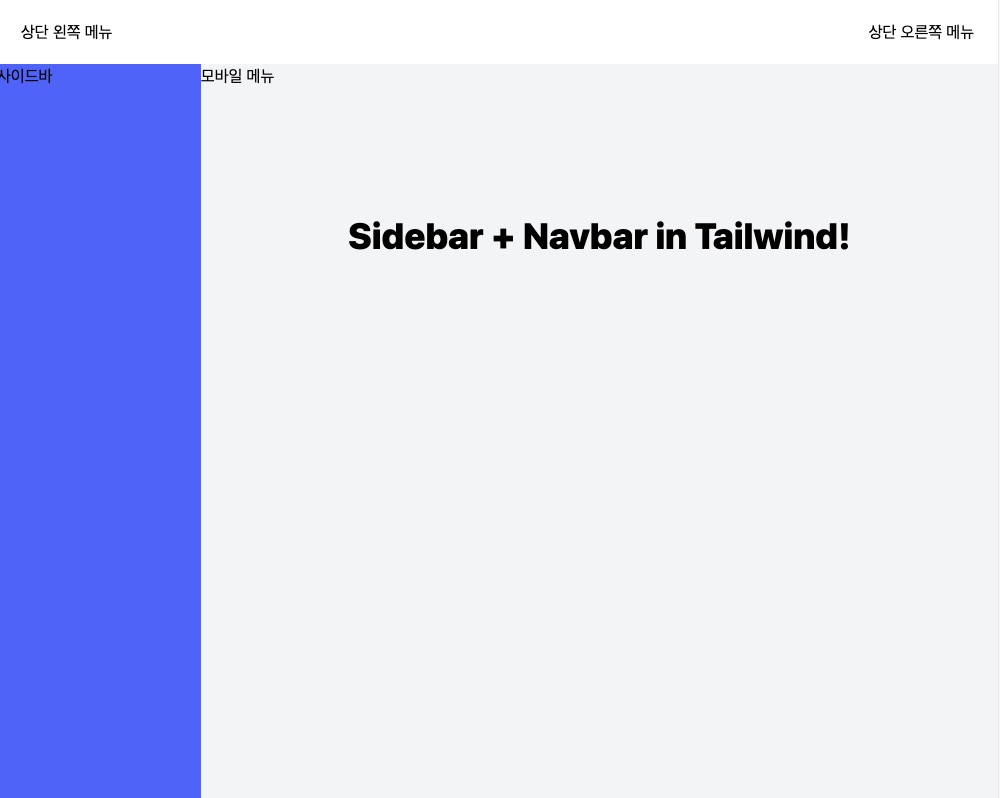
일단 bgColor란 변수를 설정했습니다.
SideBar 백그라운드 컬러인데요.
나중에 이걸 원하는 걸로 바꾸면 됩니다.
우리의 HTML 코드는 아래와 같이 구성되어 있습니다.
첫번째 nav 태그가 상단 Navbar이고요.
두번째 main 태그에 왼쪽 사이드바, 그리고 숨겨져 있는 모바엘 메뉴, 그리고 props.children 이 들어갈 자리입니다.
<div>
   <nav>
   </nav>

   <main>
   </main>
</div>
그럼 먼저 첫번째 nav 태그를 완성해 볼까요?
nav 태그 안에 먼저 큰 div 태그가 있습니다.
<div className="max-w-7xl mx-auto px-2 sm:px-6 lg:px-8">Tailwind CSS 코드를 살펴보면, max width 7 extra large 로 최대로 큰 폭으로 설정했고, 그다음 mx-auto로 X축 방향 마진을 자동으로 줘서 좌우 공간을 줬습니다.
그리고 패딩을 적절하게 줘 화면폭이 좁아질때 좌우 공간을 확보했습니다.
그리고 그 다음 div 태그를 볼까요?
<div className="flex items-center justify-between h-16">flex 컨테이너를 설정했습니다.
그리고 items-center로 수직방향으로 가운데 정렬을 지정했고, justify-between 으로 좌우 마지막으로 붙혀서 정렬시켰고, h-16으로 높이를 지정했습니다.
이제 상단 왼쪽 메뉴를 작성해 볼까요?
상단 왼쪽 메뉴는 햄버거 메뉴와 홈 로고가 들어갈 자리입니다.
          <div className="flex items-center justify-center sm:items-stretch sm:justify-start">
              {/* 햄버거 메뉴 */}
              <button
                className="px-4 py-2 text-gray-700 rounded-lg rounded-lgtext-2xl hover:bg-gray-200"
                onClick={() => setMenuToggle(!menuToggle)}
              >
                <HamburgerIcon class="" />
              </button>

              <div className="flex items-center text-2xl font-bold ml-3">
                <a href="/">Home</a>
              </div>
          </div>
상단 왼쪽 메뉴에 아이템이 햄버가 메뉴와 홈 로고 2개라서 그걸 감싸는 flex 컨테이너를 만들었습니다.
그리고 수평, 수직방향 가운데로 위치시켰고, 그다음은 sm 화면크기일 경우 items-stretch로 늘리는 모습, justify-start로 수평방향은 시작위치로 지정했습니다.
햄버거 메뉴를 감싸고 있는거는 button 태그인데요, onClick 이벤트를 이용해서 menuToggle 변수(state)를 토글 시키고 있습니다.
나중에 메뉴를 누르면 사이드 메뉴와 모바일 메뉴가 안보이게 할 예정입니다.
Home 로고에는 원하시는 로고나 img를 넣으시면 됩니다.
그 다음 상단 오른쪽 메뉴를 볼까요?
{/* NavBar 오른쪽 메뉴 */}
            <div>
              <div>
                <button
                  type="button"
                  className="bg-gray-800 flex text-sm rounded-full focus:outline-none
                focus:ring-2 focus:ring-offset-2 focus:ring-offset-gray-800 focus:ring-white"
                  id="profileBtn"
                  onClick={() => {
                    setProfileToggle(!profileToggle);
                  }}
                >

                  <img
                    className="h-8 w-8 rounded-full"
                    src="https://images.unsplash.com/photo-1472099645785-5658abf4ff4e?ixlib=rb-1.2.1&ixid=eyJhcHBfaWQiOjEyMDd9&auto=format&fit=facearea&facepad=2&w=256&h=256&q=80"
                    alt=""
                  />
                </button>
              </div>

              <div
                className={` ${
                  profileToggle ? "" : "hidden"
                } origin-top-right absolute right-0 mt-2 w-48 rounded-md shadow-lg py-1 bg-white ring-1 ring-black ring-opacity-5 focus:outline-none`}
              >
                {/* Active: "bg-gray-100", Not Active: "" */}
                <a
                  href="#"
                  className="flex items-center px-4 py-2 text-sm text-gray-700"
                >
                  <ProfileIcon class="mr-2" />
                  Your Profile
                </a>
                <a
                  href="#"
                  className="flex items-center px-4 py-2 text-sm text-gray-700"
                >
                  <SettingsIcon class="mr-2" />
                  Settings
                </a>
                <a
                  href="#"
                  className="flex items-center px-4 py-2 text-sm text-gray-700"
                >
                  <SignoutIcon class="mr-2" />
                  Sign out
                </a>
              </div>
            </div>
뭔가 조금 복잡한데요.
스크린샷을 먼저 볼까요?
 |
 |
오른쪽 메뉴는 프로파 이미지인데요, 이미지를 누르면 작은 팝업 메뉴가 나타납니다.
그래서 위 코드를 보시면 img 태그를 button 태그가 감싸고 있고, button 태그의 onClick 이벤트에 의해 profileToggle 변수가 토글됩니다.
만약 profileToggle변수가 true일 경우,
다음 코드에 의해 작은 팝업 메뉴가 보일겁니다.
              <div
                className={` ${
                  profileToggle ? "" : "hidden"
                } origin-top-right absolute right-0 mt-2 w-48 rounded-md shadow-lg py-1 bg-white ring-1 ring-black ring-opacity-5 focus:outline-none`}
              >
profileToggle 이 true일 경우는 빈칸이 리턴되고, false 일 경우에는 hidden 이 리턴되어 div 태그가 안보이게 됩니다.
이렇게 토글하는 방법은 Tailwind CSS 강좌 1편에서도 한번 본겁니다.
그때는 classNames 란 패키지를 이용했었는데요.
이번에는 그 패키지를 이용안하고 백 리터럴을 이용한 변수삽입으로 작성했습니다.
작은 팝업 메뉴는 w-48로 폭을 지정했고,
origin-top-right로 transform : top right로 이동시켰으며,
absolute로 position 을 absolute로 지정했습니다.
이게 중요한데요. 그 다음 right-0으로 절대 위치를 right: 0px 으로 지정했습니다.
그러면 이 div 태그는 바로위 태그인 프로파일 이미지 태그 바로 밑에 위치하게 됩니다.
그외 tailwind 코드는 모양에 관한거라 취향데로 하시면 됩니다.
지금까지 상단 NavBar를 완성시켰는데요.
지난 시간에 배운 NavBar에서 팝업 기능만 추가했다고 보시면 됩니다.
그러면 본격적으로 SideBar와 Contents가 들어갈 부분의 모바일 메뉴에 대해 알아 보겠습니다.
4. Sidebar 구성
먼저 aside 태그입니다.
       <aside
          className={` ${
            menuToggle ? "hidden md:block" : "hidden"
          } w-64 ${bgColor}`}
        >
          <div className="p-6">
            <a
              href=""
              className="flex items-center text-white text-3xl font-semibold hover:text-gray-300"
            >
              <SettingsIcon class="mr-3" />
              Admin
            </a>
          </div>
          <nav className="block text-white text-base font-semibold pt-3">
            <a
              href=""
              className="flex items-center text-white opacity-75 hover:opacity-100 py-4 pl-6"
            >
              <DashboardIcon class="mr-3" />
              Dashboard
            </a>
            <a
              href=""
              className="flex items-center text-white opacity-75 hover:opacity-100 py-4 pl-6"
            >
              <TablesIcon class="mr-3" />
              Tables
            </a>
            <a
              href=""
              className="flex items-center text-white opacity-75 hover:opacity-100 py-4 pl-6"
            >
              <FormsIcon class="mr-3" />
              Forms
            </a>
            <a
              href=""
              className="flex items-center text-white opacity-75 hover:opacity-100 py-4 pl-6"
            >
              <TabbedContentIcon class="mr-3" />
              Tabbed Content
            </a>
            <a
              href=""
              className="flex items-center text-white opacity-75 hover:opacity-100 py-4 pl-6"
            >
              <CalendarIcon class="mr-3" />
              Calendar
            </a>
            <a
              href=""
              className="flex items-center text-white opacity-75 hover:opacity-100 py-4 pl-6"
            >
              <SupportIcon class="mr-3" />
              Support
            </a>
          </nav>
        </aside>
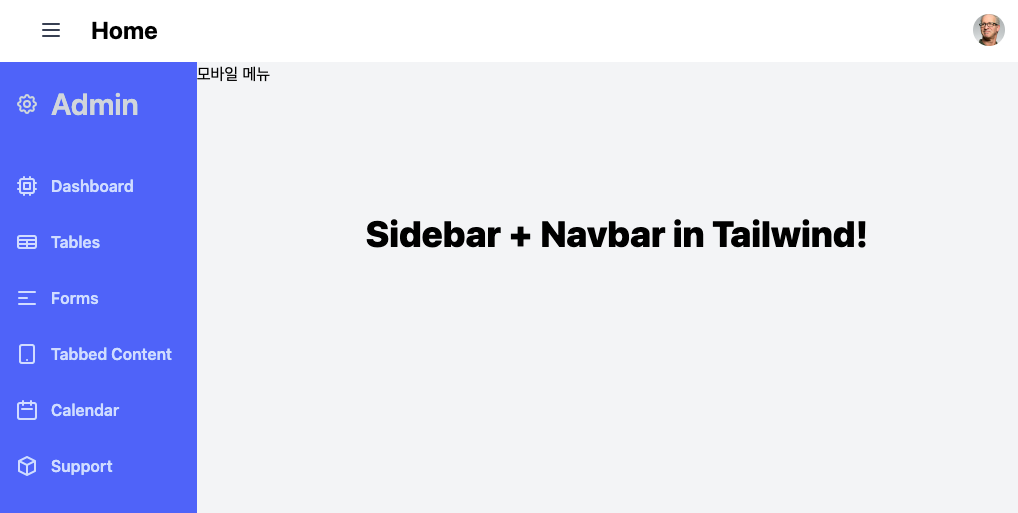
aside 태그에서 중요한거는 바로 aside 태그를 햄버거 메뉴를 클릭했을때 사라지게 하는건데요.
       <aside
          className={` ${
            menuToggle ? "hidden md:block" : "hidden"
          } w-64 ${bgColor}`}
        >
위 코드처럼 menuToggle이 true일 경우에는 hidden md:block 로 지정했고 menuToggle이 false일 경우 안보이게 했습니다.
menuToggle이 true일 경우에는 hidden md:block 로 지정했는데요.
이게 무슨 뜻이냐면 기본적으로 hidden 인데, md 사이즈부터 block라는 뜻입니다.
즉, 기본 사이즈인 sm에서는 hidden 이고 그 위 md 사이즈부터는 보여주라는 뜻이죠.
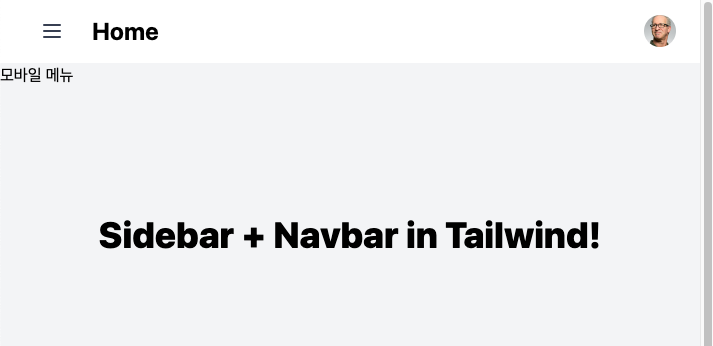
위 그림처럼 모바일 사이즈가 되니까 aside 태그가 hidden 이 됐습니다.
모바일 메뉴를 알아볼까요?
// 모바일 메뉴

<div>

  <header>
    모바일 메뉴
  </header>

  <slot>
  컨텐츠 위치
  </slot

</div>
위 코드처럼 모바일 메뉴태그에는 컨텐츠를 위치시킬 자리가 필요합니다.
이 점 유의하시고 다음 코드를 보십시요.
{/* Mobile Header & Nav */}
        <div className="w-full flex flex-col h-screen overflow-y-hidden">
          <header
            className={`w-full py-5 px-6 ${
              menuToggle ? "hidden" : "block"
            } md:hidden`}
          >
            {/* Dropdown Nav */}
            <nav className="text-white text-base font-semibold bg-gray-500 ">
              <a
                href=""
                className="flex items-center text-white opacity-75 hover:opacity-100 py-4 pl-6"
              >
                <DashboardIcon class="mr-3" />
                Dashboard
              </a>
              <a
                href=""
                className="flex items-center text-white opacity-75 hover:opacity-100 py-4 pl-6"
              >
                <TablesIcon class="mr-3" />
                Tables
              </a>
              <a
                href=""
                className="flex items-center text-white opacity-75 hover:opacity-100 py-4 pl-6 "
              >
                <FormsIcon class="mr-3" />
                Forms
              </a>
              <a
                href=""
                className="flex items-center text-white opacity-75 hover:opacity-100 py-4 pl-6"
              >
                <TabbedContentIcon class="mr-3" />
                Tabbed Content
              </a>
              <a
                href=""
                className="flex items-center text-white opacity-75 hover:opacity-100 py-4 pl-6"
              >
                <CalendarIcon class="mr-3" />
                Calendar
              </a>
              <a
                href=""
                className="flex items-center text-white opacity-75 hover:opacity-100 py-4 pl-6"
              >
                <SupportIcon class="mr-3" />
                Support
              </a>
            </nav>
          </header>

          {/* props.children position here */}
          <slot>{props.children}</slot>
        </div>
모바일 메뉴도 menuToggle 변수에 따라 hidden 인지 아닌지 나타내는데요.
         <header
            className={`w-full py-5 px-6 ${
              menuToggle ? "hidden" : "block"
            } md:hidden`}
          >
위 사이드 메뉴인 aside 와는 반대로 했습니다.
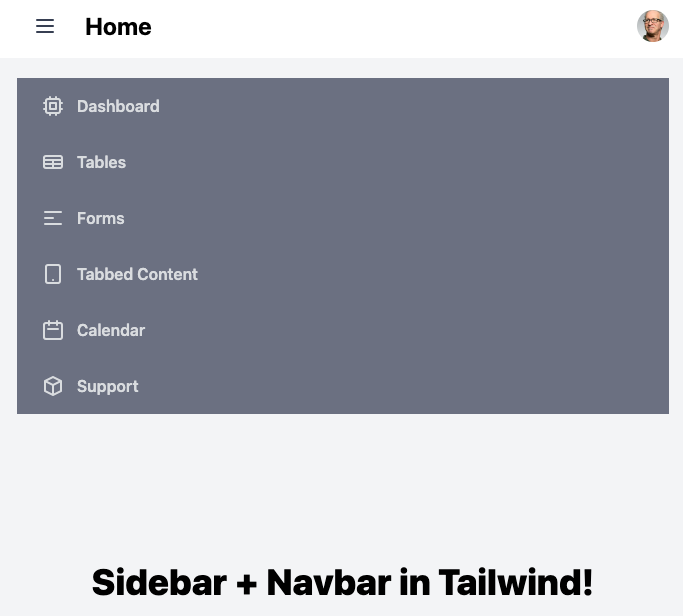
햄버거 메뉴버튼을 눌렀을때 모양입니다.
어떤가요?
화면 크가가 작을 때는 사이드 메뉴가 보이지 않습니다.
그럼 화면을 한번 키워 볼까요?
화면을 키우면 바로 모바일 메뉴가 사라집니다.
그럼 다시 햄버거 메뉴를 클릭하면 다음과 같이 사이드 메뉴가 나옵니다.
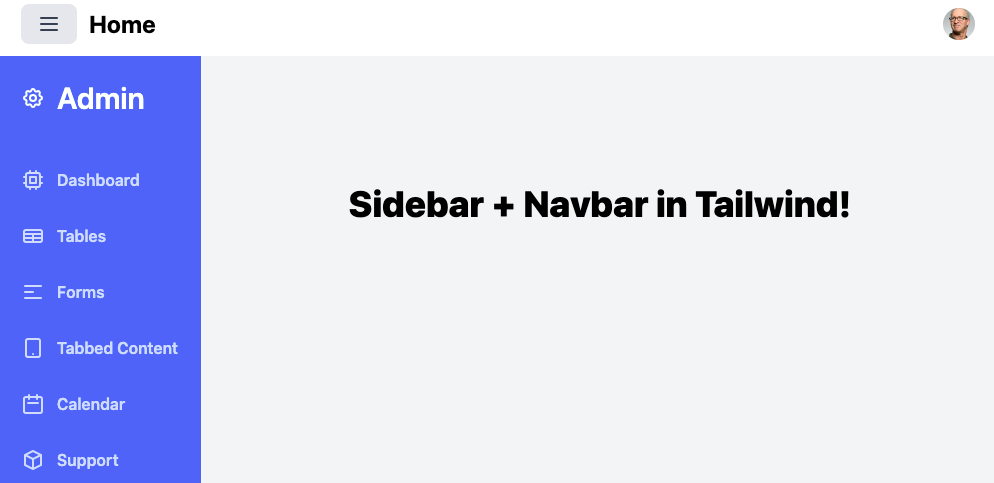
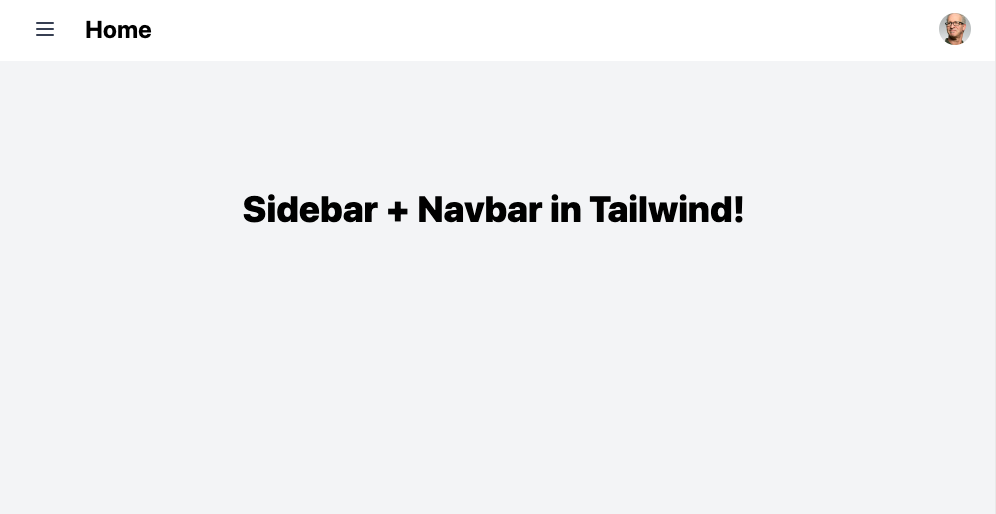
화면이 큰 경우에도 햄버거 메뉴를 눌렀을 때 사이드메뉴가 사라진 스크린샷입니다.
어떤가요?
완성된 코드는 아래와 같습니다.
/components/SideNavbar.tsx
import React, { useState } from "react";

import {
  HamburgerIcon,
  ProfileIcon,
  SettingsIcon,
  SignoutIcon,
  DashboardIcon,
  TablesIcon,
  FormsIcon,
  TabbedContentIcon,
  CalendarIcon,
  SupportIcon,
} from "./Icons";

type Props = {
  children: React.ReactNode;
};

const SideNavbar = (props: Props) => {
  const bgColor: string = "bg-blue-500";
  const [menuToggle, setMenuToggle] = useState(true);
  const [profileToggle, setProfileToggle] = useState(false);

  return (
    <div>
      <nav className="bg-white">
        <div className="max-w-7xl mx-auto px-2 sm:px-6 lg:px-8">
          <div className="flex items-center justify-between h-16">
            {/* NavBar 상단 왼쪽 메뉴 */}
            <div className="flex items-center justify-center sm:items-stretch sm:justify-start">
              {/* 햄버거 메뉴 */}
              <button
                className="px-4 py-2 text-gray-700 rounded-lg rounded-lgtext-2xl hover:bg-gray-200"
                onClick={() => setMenuToggle(!menuToggle)}
              >
                <HamburgerIcon class="" />
              </button>

              <div className="flex items-center text-2xl font-bold ml-3">
                <a href="/">Home</a>
              </div>
            </div>
            {/* NavBar 상단 오른쪽 메뉴 */}
            {/* NavBar 오른쪽 메뉴 */}
            <div>
              <div>
                <button
                  type="button"
                  className="bg-gray-800 flex text-sm rounded-full focus:outline-none
                focus:ring-2 focus:ring-offset-2 focus:ring-offset-gray-800 focus:ring-white"
                  id="profileBtn"
                  onClick={() => {
                    setProfileToggle(!profileToggle);
                  }}
                >
                  {/* <span className="sr-only">Open user menu</span> */}
                  <img
                    className="h-8 w-8 rounded-full"
                    src="https://images.unsplash.com/photo-1472099645785-5658abf4ff4e?ixlib=rb-1.2.1&ixid=eyJhcHBfaWQiOjEyMDd9&auto=format&fit=facearea&facepad=2&w=256&h=256&q=80"
                    alt=""
                  />
                </button>
              </div>

              <div
                className={` ${
                  profileToggle ? "" : "hidden"
                } origin-top-right absolute right-0 mt-2 w-48 rounded-md shadow-lg py-1 bg-white ring-1 ring-black ring-opacity-5 focus:outline-none`}
              >
                {/* Active: "bg-gray-100", Not Active: "" */}
                <a
                  href="#"
                  className="flex items-center px-4 py-2 text-sm text-gray-700"
                >
                  <ProfileIcon class="mr-2" />
                  Your Profile
                </a>
                <a
                  href="#"
                  className="flex items-center px-4 py-2 text-sm text-gray-700"
                >
                  <SettingsIcon class="mr-2" />
                  Settings
                </a>
                <a
                  href="#"
                  className="flex items-center px-4 py-2 text-sm text-gray-700"
                >
                  <SignoutIcon class="mr-2" />
                  Sign out
                </a>
              </div>
            </div>
          </div>
        </div>
      </nav>

      {/* ===================================================================
          상단 Navbar 끝
          =================================================================== */}

      {/* 사이드 바 메인 */}
      <main className="flex bg-gray-100">
        {/* SideBar */}
        <aside
          className={` ${
            menuToggle ? "hidden md:block" : "hidden"
          } w-64 ${bgColor}`}
        >
          <div className="p-6">
            <a
              href=""
              className="flex items-center text-white text-3xl font-semibold hover:text-gray-300"
            >
              <SettingsIcon class="mr-3" />
              Admin
            </a>
          </div>
          <nav className="block text-white text-base font-semibold pt-3">
            <a
              href=""
              className="flex items-center text-white opacity-75 hover:opacity-100 py-4 pl-6"
            >
              <DashboardIcon class="mr-3" />
              Dashboard
            </a>
            <a
              href=""
              className="flex items-center text-white opacity-75 hover:opacity-100 py-4 pl-6"
            >
              <TablesIcon class="mr-3" />
              Tables
            </a>
            <a
              href=""
              className="flex items-center text-white opacity-75 hover:opacity-100 py-4 pl-6"
            >
              <FormsIcon class="mr-3" />
              Forms
            </a>
            <a
              href=""
              className="flex items-center text-white opacity-75 hover:opacity-100 py-4 pl-6"
            >
              <TabbedContentIcon class="mr-3" />
              Tabbed Content
            </a>
            <a
              href=""
              className="flex items-center text-white opacity-75 hover:opacity-100 py-4 pl-6"
            >
              <CalendarIcon class="mr-3" />
              Calendar
            </a>
            <a
              href=""
              className="flex items-center text-white opacity-75 hover:opacity-100 py-4 pl-6"
            >
              <SupportIcon class="mr-3" />
              Support
            </a>
          </nav>
        </aside>

        {/* Mobile Header & Nav */}
        <div className="w-full flex flex-col h-screen overflow-y-hidden">
          <header
            className={`w-full py-5 px-6 ${
              menuToggle ? "hidden" : "block"
            } md:hidden`}
          >
            {/* Dropdown Nav */}
            <nav className="text-white text-base font-semibold bg-gray-500 ">
              <a
                href=""
                className="flex items-center text-white opacity-75 hover:opacity-100 py-4 pl-6"
              >
                <DashboardIcon class="mr-3" />
                Dashboard
              </a>
              <a
                href=""
                className="flex items-center text-white opacity-75 hover:opacity-100 py-4 pl-6"
              >
                <TablesIcon class="mr-3" />
                Tables
              </a>
              <a
                href=""
                className="flex items-center text-white opacity-75 hover:opacity-100 py-4 pl-6 "
              >
                <FormsIcon class="mr-3" />
                Forms
              </a>
              <a
                href=""
                className="flex items-center text-white opacity-75 hover:opacity-100 py-4 pl-6"
              >
                <TabbedContentIcon class="mr-3" />
                Tabbed Content
              </a>
              <a
                href=""
                className="flex items-center text-white opacity-75 hover:opacity-100 py-4 pl-6"
              >
                <CalendarIcon class="mr-3" />
                Calendar
              </a>
              <a
                href=""
                className="flex items-center text-white opacity-75 hover:opacity-100 py-4 pl-6"
              >
                <SupportIcon class="mr-3" />
                Support
              </a>
            </nav>
          </header>

          {/* props.children position here */}
          <slot>{props.children}</slot>
        </div>
      </main>
    </div>
  );
};

export default SideNavbar;
지금까지 Tailwind CSS로 사이드바 Navbar 만들기였습니다.
'코딩 > React' 카테고리의 다른 글
| NextJS + Typescript + TailwindCSS 설치 방법 (2) | 2021.12.26 |
|---|---|
| TailwindCSS 강좌 3편 - Card 만들기 (6) | 2021.10.16 |
| Tailwind css 반응형 메뉴 navbar 만들기 (2) | 2021.10.10 |
| NextJS Prisma DB로 블로그 시스템 만들기 2편 (0) | 2021.10.08 |
| NextJS Prisma DB로 블로그 시스템 만들기 (1) | 2021.10.06 |

