

안녕하세요?
2편까지 TDD 의 유닛테스트인 myTest.cpp 까지 만들어 봤는데요.
이제 TDD 유닛테스트를 할려면 컴파일해서 실행해 봐야겠죠.
컴파일은 가장 유명하고 많이 쓰는 cmake를 이용하겠습니다.
일단 프로젝트 상단에 최상위 CMakeLists.txt 파일을 만들고, test 폴더에도 CMakeLists.txt 파일을 만들어 자동으로 컴파일 및 유닛테스트가 실행되게끔 할 예정입니다.
일단 최상위 CMakeLists.txt 파일을 만듭시다.
CMakeLists.txt 의 기본 내용은 다음과 같습니다.
# Example CMake file for compiling & linking a project
#
# Copyright (c) 2012-2020 cpro95 (cpro95@gmail.com)
#
# Distributed under the MIT License (MIT) (See accompanying file LICENSE.txt or
# copy at http://opensource.org/licenses/MIT)

cmake_minimum_required(VERSION 3.1) # for "CMAKE_CXX_STANDARD" version
project(renamer-youtube-dl VERSION 2.0)

set(CMAKE_BUILD_TYPE Debug)
# set(CMAKE_BUILD_TYPE Release)

# for C++11 compiler
set(CMAKE_CXX_STANDARD 11)
set(CMAKE_CXX_STANDARD_REQUIRED ON)

enable_testing()

# add library myStringLIB
set(myLib myStringLib)

# in case of not header-only library
#add_library(${myLib} STATIC ${CMAKE_SOURCE_DIR}/src/lib/myStringLib.cpp)

# myLib is header-only library
# INTERFACE is the key to compile header-only library
add_library(${myLib} INTERFACE)

# target_include_directories command must use once in cmakelists file.
# add_library for INTERFACE, you must use target_include_directories as INTERFACE
target_include_directories(${myLib} INTERFACE ${PROJECT_SOURCE_DIR}/src/lib
                                           ${CMAKE_SOURCE_DIR}/external)

# Add main.cpp example source code to the executable
add_executable(${CMAKE_PROJECT_NAME} src/main.cpp)

target_link_libraries(${CMAKE_PROJECT_NAME} ${myLib})

add_subdirectory(test)
그리고 test 폴더 밑에 CMakeLists.txt를 하나 더 만들고 아래와 같이 입력합니다.
cmake_minimum_required(VERSION 3.8)

set(This myTest)

set(Sources
    myTest.cpp
)

set(Headers catch.hpp)

add_executable(${This} ${Sources} ${Headers})
target_link_libraries(${This}
    myStringLib
)

add_test(
    NAME ${This}
    COMMAND ${This}
)
이제 프로젝트 최상위 폴더에서 build.sh 나 build.bat 파일을 실행하면 빌드 및 유닛테스트를 자동으로 하게 됩니다.
일단 최상위 폴더에서 기본적인 main.cpp 파일을 임시로 만들어 보겠습니다.

#include <iostream>
#include <string>

#include "spdlog/spdlog.h"
#include "lib/myStringLib.hpp"

int main(int argc, char **argv)
{

    spdlog::info("youtube-dl name fix it");
    myStringLib::myStringLib();
}
일단 main.cpp 파일에서는 우리가 만든 myStringLib 라이브러리의 가장 기본적인 함수를 실행만 할 겁니다.
콘솔창에서 cmake build를 해보겠습니다.
일단 build.sh 가 실행 권한이 없으니까 실행 권한을 부여하겠습니다.
chmod a+x ./build.sh
그리고 build.sh 를 실행해 봅시다.
./build.sh
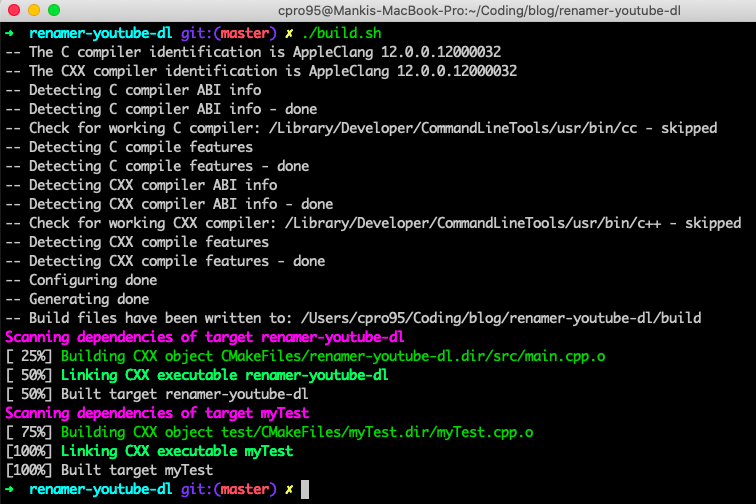
빌드는 성공적입니다.
main.cpp 도 빌드 성공, myTest.cpp 도 빌드 성공했습니다.
그럼 build 폴더로 이동해 테스트를 해보겠습니다.
cd build
make test

유닛 테스트도 성공적입니다.
참고로 VS Code 에서 CMake Run Tests 를 실행한 화면을 보여드리면,

VS Code 의 CMake Extension이 Run Tests 시 자동으로 ctest를 실행하는 모습입니다.
그럼 콘솔창에서도 make test까지 할 수 있게 build.sh 파일을 수정해 볼까요?
#!/bin/sh
# Copyright (c) 2012-2020 Sébastien Rombauts (sebastien.rombauts@gmail.com)
#
# Distributed under the MIT License (MIT) (See accompanying file LICENSE.txt
# or copy at http://opensource.org/licenses/MIT)

# exit on first error
set -e

mkdir -p build
cd build

# Generate a Makefile for GCC (or Clang, depanding on CC/CXX envvar)
cmake -DCMAKE_BUILD_TYPE=Release ..

# Build (ie 'make')
cmake --build .

# Make Tests
make test
마지막에 make test 문구만 추가했습니다.
윈도우 환경을 위해서 build.bat 파일도 수정해 볼까요?
@REM Copyright (c) 2012-2020 Sebastien Rombauts (sebastien.rombauts@gmail.com)
@REM
@REM Distributed under the MIT License (MIT) (See accompanying file LICENSE.txt
@REM or copy at http://opensource.org/licenses/MIT)
mkdir build
cd build

@REM Generate a Visual Studio solution for latest version found
cmake ..
@if ERRORLEVEL 1 goto onError

@REM Build default configuration (ie 'Debug')
cmake --build .
@if ERRORLEVEL 1 goto onError

goto onSuccess

:onError
@echo An error occured!
:onSuccess
ctest
cd ..
마지막쯤 보시면 ctest가 보이실겁니다.
이제 C++ 프로그래밍 프로젝트를 완성했습니다.
폴더 구조, cmake, unit test 까지 기초 골격을 완성했으니 본격적인 TDD 방식의 라이브러리 제작을 하면 되겠죠?
이 쯤에서 git commit 한번 할께요.
git add --all
git commit -m "basic structure finished"
다음편에는 우리의 라이브러이인 myStringLib 에 helper 함수를 추가해 봅시다.
'코딩 > C와 C++' 카테고리의 다른 글
| 1편-예제를 통한 C 언어 기초 강의 (0) | 2020.12.29 |
|---|---|
| C++에서 spdlog 를 활용해서 log를 좀 더 쉽게 해보기 (2) | 2020.12.11 |
| 4편, c++ 프로그래밍 CMake 예제 (0) | 2020.12.05 |
| 2편, c++ 프로그래밍 CMake 예제 (0) | 2020.12.02 |
| 1편, c++ 프로그래밍 CMake 예제 (1) | 2020.12.02 |