

안녕하세요?
C와 C++ 코딩을 할 때 간단하게 디버그할 때나 또는 나중을 위해서 로그파일을 남길 필요가 있는데요.
이럴때 필요한 유틸중에 C++ 세계에서는 유명한게 spdlog입니다.
github 링크: https://github.com/gabime/spdlog
gabime/spdlog
Fast C++ logging library. Contribute to gabime/spdlog development by creating an account on GitHub.
github.com
이 spdlog 사용법을 알아 보겠습니다.
일단 C++ 컴파일을 위한 세팅을 해보겠습니다.
mkdir spdlog-test
cd spdlog-test

mkdir src
mkdir external

touch CMakeLists.txt
touch build.sh
touch build.bat
touch src/main.cpp
일단 CMakeLists.txt 파일에 아래 내용을 넣어 줍시다.
# Example CMake file for compiling & linking a project
#
# Copyright (c) 2012-2020 cpro95 (cpro95@gmail.com)
#
# Distributed under the MIT License (MIT) (See accompanying file LICENSE.txt or
# copy at http://opensource.org/licenses/MIT)

# for "CMAKE_CXX_STANDARD" version
cmake_minimum_required(VERSION 3.1)
project(spdlog-test VERSION 1.0)

# set(CMAKE_BUILD_TYPE Debug)
set(CMAKE_BUILD_TYPE Debug)

# for C++11 compiler
set(CMAKE_CXX_STANDARD 11)
set(CMAKE_CXX_STANDARD_REQUIRED ON)


# include directories
include_directories(${CMAKE_SOURCE_DIR}/external)

# Add main.cpp example source code to the executable
add_executable(${CMAKE_PROJECT_NAME} src/main.cpp)
build.sh 파일입니다.
#!/bin/sh
# Copyright (c) 2012-2020 cpro95 (cpro95@gmail.com)
#
# Distributed under the MIT License (MIT) (See accompanying file LICENSE.txt
# or copy at http://opensource.org/licenses/MIT)

# exit on first error
set -e

mkdir -p build
cd build

# Generate a Makefile for GCC (or Clang, depanding on CC/CXX envvar)
cmake -DCMAKE_BUILD_TYPE=Release ..

# Build (ie 'make')
cmake --build .
build.bat 파일입니다.
@REM Copyright (c) 2012-2020 cpro95 (cpro95@gmail.com)
@REM
@REM Distributed under the MIT License (MIT) (See accompanying file LICENSE.txt
@REM or copy at http://opensource.org/licenses/MIT)
mkdir build
cd build

@REM Generate a Visual Studio solution for latest version found
cmake ..
@if ERRORLEVEL 1 goto onError

@REM Build default configuration (ie 'Debug')
cmake --build .
@if ERRORLEVEL 1 goto onError

goto onSuccess

:onError
@echo An error occured!
:onSuccess
cd ..
src/main.cpp 파일입니다.
#include <iostream>

int main() {
    std::cout << "Hello spdlog test!" << std::endl;
}
이제 빌드를 해볼까요?

실행까지 잘 되네요. 일단 C++ 프로젝트 구성이 완료 되었습니다.
SPDLOG 다운로드
이제 spdlog를 다운 받아야겠죠?
github에서 ZIP 파일로 다운받아서 압출을 풀어보면 include 폴더가 보입니다.

include 폴더로 가볼까요?

spdlog 폴더가 보입니다.
이 spdlog 폴더를 통채로 우리 프로젝트의 external 폴더에 복사하시면 됩니다.
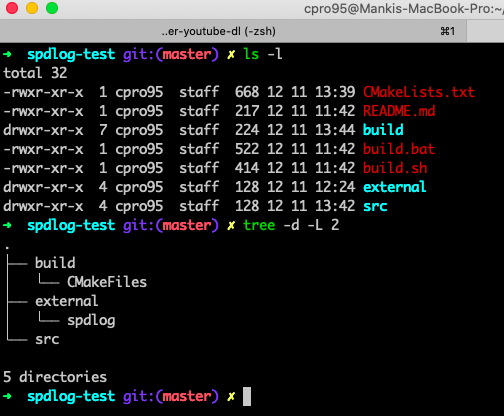
위 스크린샷처럼 external 밑에 spdlog 폴더가 생겼습니다.
이제 spdlog를 사용할 수 있는 환경이 완성 되었습니다.
왜냐하면 spdlog는 header-only library 입니다.
그래서 나중에 header만 include 해서 쉽게 컴파일할 수 있습니다.
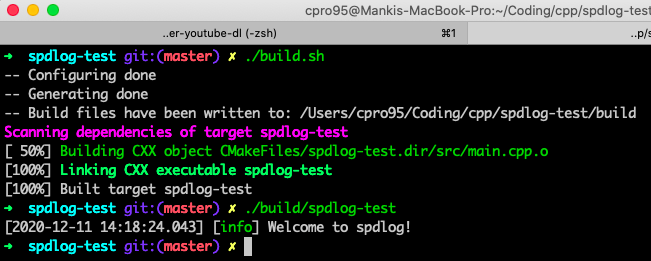
이제 본격적인 spdlog 테스트를 해볼까요?
src/main.cpp 파일을 열어서 아래와 같이 입력해 봅시다.
#include <iostream>
#include "spdlog/spdlog.h"

int main() {
    std::cout << "Hello spdlog test!" << std::endl;
    spdlog::info("Welcome to spdlog!");
}
include 할때 spdlog/spdlog.h 만 하시면 됩니다.
CmakeLists.txt에 include_directories 를 등록해 놔서 자동으로 cmake가 알아서 합니다.
실행해 볼까요?

아주 잘 되네요!. 우리는 spdlog의 첫번째 실행을 완료했습니다.
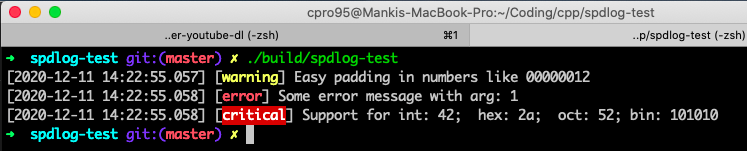
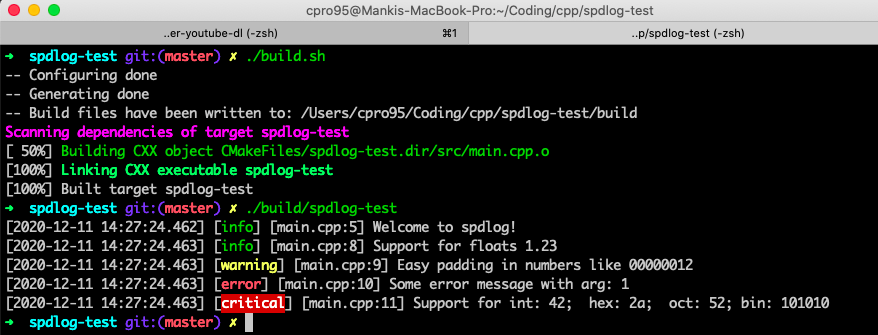
spdlog::info 말고 다른게 뭐가 있는지 볼까요?
#include <iostream>
#include "spdlog/spdlog.h"

int main()
{
    std::cout << "Hello spdlog test!" << std::endl;
    spdlog::info("Welcome to spdlog!");

    spdlog::error("Some error message with arg: {}", 1);
    spdlog::warn("Easy padding in numbers like {:08d}", 12);
    spdlog::critical("Support for int: {0:d};  hex: {0:x};  oct: {0:o}; bin: {0:b}", 42);
    spdlog::info("Support for floats {:03.2f}", 1.23456);
    spdlog::info("Positional args are {1} {0}..", "too", "supported");
    spdlog::info("{:<30}", "left aligned");
}
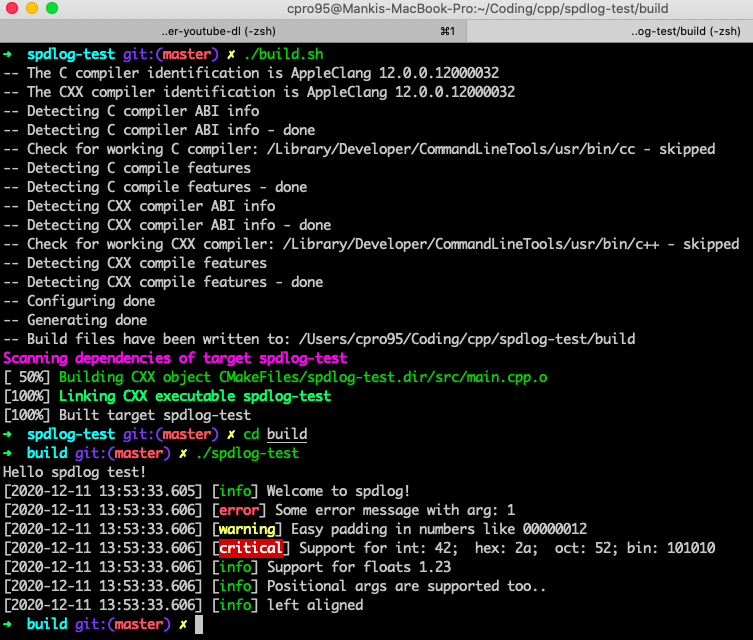
실행도 아주 잘되네요.
spdlog하실때 원하는 걸로 하시면 됩니다.
그런데 다음 코드처럼 함수 인자가 처음 보는건데 간단히 설명해 드리겠습니다.
spdlog::error("Some error message with arg: {}", 1);
("Some error message with arg: {}", 1) 처럼 여기 보시면 기존에 보던 C++ 텍스트 출력이 아닌데요.
이건 fmtlib::fmt 라이브러리를 쓴겁니다.
이 방식은 최신 프로그래밍 언어에서는 기본적으로 지원하는 방식입니다.
spdlogs는 fmtlib::fmt 라이브러리를 포함하고 있어서, spdlog만 include 하면 fmt 함수를 쓸 수 있습니다.
    fmt::print("Hello, world!\n");
    std::string s = fmt::format("The answer is {}.", 42);
    // s == "The answer is 42."
    fmt::print("{}\n",s);

    std::string s2 = fmt::format("I'd rather be {1} than {0}.", "right", "happy");
    // s2 == "I'd rather be happy than right."
    fmt::print(s2);
위 예제를 보시면 문자열 조합이 좀더 쉬어지는게 눈으로 느껴지시죠?
이제 본연의 목적인 spdlog에 집중해 볼까요?
프로덕션 빌드시 로그 없애기
테스트 할때는 빌드를 debug 방식으로 하는데, 배포할 때는 release방식으로 합니다.
로그 내역도 배포할때는 필요없겠죠?
그래서 간단히 spdlog 전체를 on/off 할 수 있는 방법이 있습니다.
#include "spdlog/spdlog.h"

int main()
{
    spdlog::info("Welcome to spdlog!");
    spdlog::set_level(spdlog::level::off); // Set global log level to debug

    spdlog::error("Some error message with arg: {}", 1);
    spdlog::warn("Easy padding in numbers like {:08d}", 12);
    spdlog::critical("Support for int: {0:d};  hex: {0:x};  oct: {0:o}; bin: {0:b}", 42);
    spdlog::info("Support for floats {:03.2f}", 1.23456);
}
실행 결과를 보시면 spdlog::set_level 하기 전인 spdlog::info 만 로그되었습니다.
그 이후는 off가 되었네요.
그러면 spdlog::level 에는 다음과 같은것이 있습니다.
trace, debug, info, warn, error, critical, off
우선 순위를 나타냅니다.
그럼 spdlog::set_level::warn 으로 세팅해볼까요?
#include "spdlog/spdlog.h"

int main()
{
    // spdlog::info("Welcome to spdlog!");
    spdlog::set_level(spdlog::level::warn); // Set global log level to debug

    spdlog::trace("Trace");
    spdlog::debug("Debug");
    spdlog::info("Support for floats {:03.2f}", 1.23456);
    spdlog::warn("Easy padding in numbers like {:08d}", 12);
    spdlog::error("Some error message with arg: {}", 1);
    spdlog::critical("Support for int: {0:d};  hex: {0:x};  oct: {0:o}; bin: {0:b}", 42);
}
spdlog::level 을 warn 으로 했을 때는 trace, debug, info, warn, error, critical, off 이 순서에서 볼때 warn 초과 되는 부분 trace, debug, info 는 로깅되지 않을 걸 볼 수 있습니다.
이런 방식으로 배포판 빌드시 spdlog::set_level을 조정하시면 됩니다.
매크로를 이용한 SPDLOG
spdlog::info 이런식 말고 매크로를 이용한 로깅 방법이 있습니다.
#include "spdlog/spdlog.h"

int main()
{
    SPDLOG_INFO("Welcome to spdlog!");
    SPDLOG_TRACE("Trace");
    SPDLOG_DEBUG("Debug");
    SPDLOG_INFO("Support for floats {:03.2f}", 1.23456);
    SPDLOG_WARN("Easy padding in numbers like {:08d}", 12);
    SPDLOG_ERROR("Some error message with arg: {}", 1);
    SPDLOG_CRITICAL("Support for int: {0:d};  hex: {0:x};  oct: {0:o}; bin: {0:b}", 42);
}
실행 결과는 똑같습니다.
그리고 set_level 도 매크로로 지정합니다.
#define SPDLOG_ACTIVE_LEVEL SPDLOG_LEVEL_DEBUG
상기 문구를 이용해 SPDLOG_ACTIVE_LEVEL 을 지정하면 됩니다.
우선순위는 TRACE, DEBUG, INFO, WARN, ERROR, CRITICAL, OFF 입니다.
만약 SPDLOG_LEVEL_OFF 로 지정하면 로깅을 하지 않게 되는데,
여기서 중요한 기능은 매크로를 이용해서 SPDLOG_LEVEL_OFF 하면 SPDLOG 매크로를 모두 제거하고 컴파일합니다.
좀 더 프로덕션 빌드할 때 좋은 기능입니다.
파일로 로깅하기
지금까지는 화면에 로깅했는데 파일로도 로깅할 수 있습니다.
#include "spdlog/spdlog.h"
#include "spdlog/sinks/basic_file_sink.h"

int main()
{
    spdlog::info("Welcome to spdlog!");

    // Set the default logger to file logger
    auto file_logger = spdlog::basic_logger_mt("basic_logger", "logs/basic.txt");
    spdlog::set_default_logger(file_logger);

    spdlog::info("log to file!");
}

잘 실행되었네요.
이제까지 spdlog에 대해 알아봤습니다.
그럼 C++ 프로그래밍에 많은 도움이 되셨으면 합니다.
'코딩 > C와 C++' 카테고리의 다른 글
| 2편-예제를 통한 C 언어 기초 강의 (0) | 2020.12.30 |
|---|---|
| 1편-예제를 통한 C 언어 기초 강의 (0) | 2020.12.29 |
| 4편, c++ 프로그래밍 CMake 예제 (0) | 2020.12.05 |
| 3편, c++ 프로그래밍 CMake 예제 (0) | 2020.12.03 |
| 2편, c++ 프로그래밍 CMake 예제 (0) | 2020.12.02 |