안녕하세요?
오늘은 지금껏 만들어 왔던 supabase 로그인 구현 템플릿에 더해서 Supabase 데이터베이스를 이용해서 간단한 블로깅 시스템을 만들어 보겠습니다.
먼저, 블로그 데이터를 저장할 DB의 테이블을 만들어야 하는데요.
일단 supabase 대시보드에서 아래 그림과 같이 SQL Editor을 이용해서 테이블의 schema를 짜 보도록 하겠습니다.
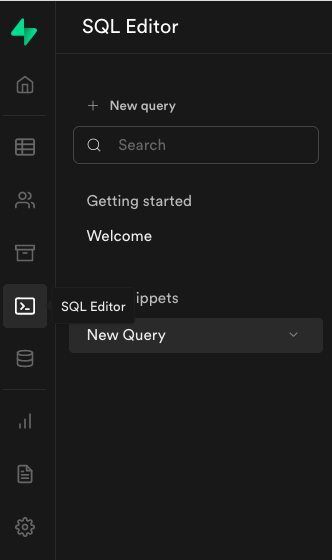
아래 New Query를 클릭하고 오른쪽 화면에서 다음과 같이 입력합시다.
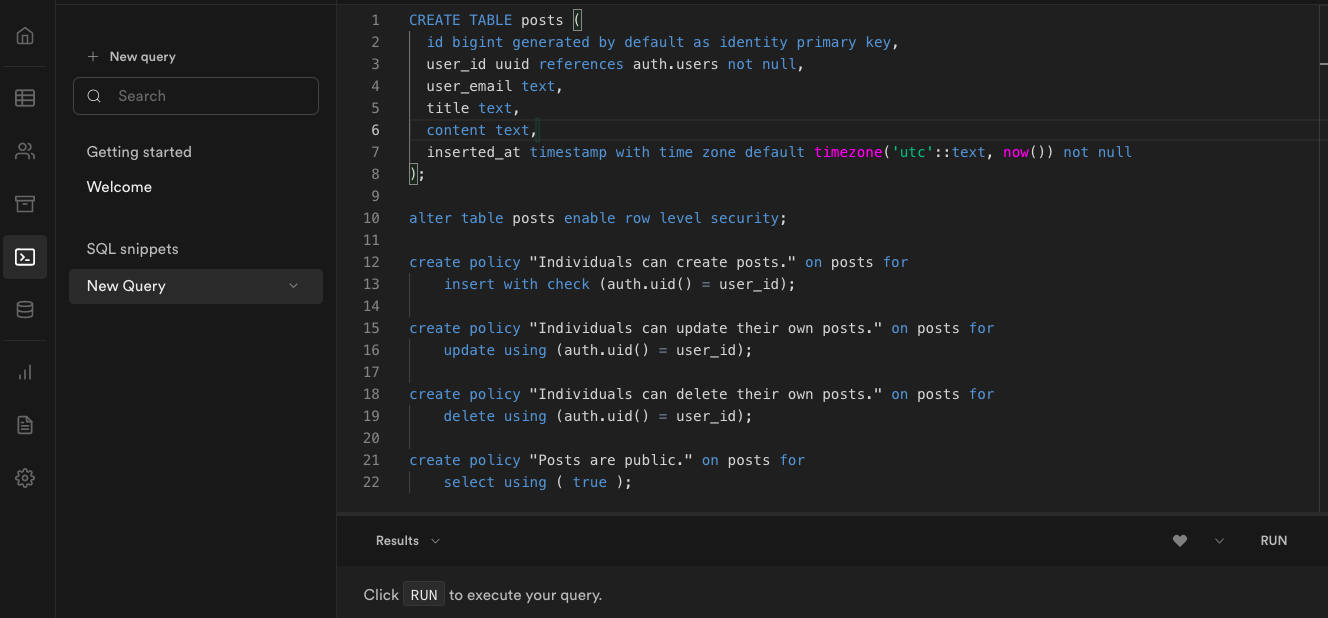
그리고 오른쪽 아래에 RUN 버튼을 눌러 table을 만들도록 하겠습니다.
Supabase에서는 위와 같이 SQL 명령어를 위와 같이 직접 입력해서 만들 수 있습니다.
CREATE TABLE posts (
  id bigint generated by default as identity primary key,
  user_id uuid references auth.users not null,
  user_email text,
  title text,
  content text,
  inserted_at timestamp with time zone default timezone('utc'::text, now()) not null
);

alter table posts enable row level security;

create policy "Individuals can create posts." on posts for
    insert with check (auth.uid() = user_id);

create policy "Individuals can update their own posts." on posts for
    update using (auth.uid() = user_id);

create policy "Individuals can delete their own posts." on posts for
    delete using (auth.uid() = user_id);

create policy "Posts are public." on posts for
    select using ( true );
SQL 명령어는 간단합니다.
CREATE TABLE posts () 라고 하면 posts라는 테이블을 만들게 됩니다.
그리고 posts () 안에 테이블의 스키마를 지정할 수 있습니다.
일단 간단하게 id, user_id, user_email, title, content, inserted_at을 넣었는데요.
id는 테이블 데이터가 하나 생길때 마다 자동 생성되는 아이디이고요.
마지막에 inserted_at은 데이터가 생성된 시간을 자동으로 입력하게 됩니다.
그리고 그 다음 SQL 명령어가 생소하실 건데요.
supabase는 PostgreSQL을 DB를 사용하는데요.
PostgreSQL의 강력한 기능이 바로 Row Level Security(RLS)입니다.
alter table posts enable row level security;위의 코드가 바로 PostgreSQL의 RLS 기능을 사용할 수 있게 on 시키는 명령어입니다.
즉, table posts는 RLS 기능을 사용할 수 있도록 하는 겁니다.
그리고 그다음이 바로 RLS기능을 상세하게 적은 건데요.
create policy "Individuals can create posts." on posts for
    insert with check (auth.uid() = user_id);

create policy "Individuals can update their own posts." on posts for
    update using (auth.uid() = user_id);

create policy "Individuals can delete their own posts." on posts for
    delete using (auth.uid() = user_id);

create policy "Posts are public." on posts for
    select using ( true );
Policy라고 합니다.
create policy "Indi~~~~~~~~~~~" on posts for라고 되어 있는데요.
바로 영어 해석 그대로입니다.
"" 안에 있는 거는 설명인데요. 아무렇게나 넣어도 됩니다.
그냥 policy에 대한 간단한 설명을 넣으시면 됩니다.
그리고 바로 다음 줄이 insert with check (auth.uid() = user_id);인데요.
잘 보시면 create policy를 총 4개를 만들었습니다.
즉, insert, update, delete, select라고 SQL 명령어 4가지의 경우에 어떻게 할 건지 정한 건데요.
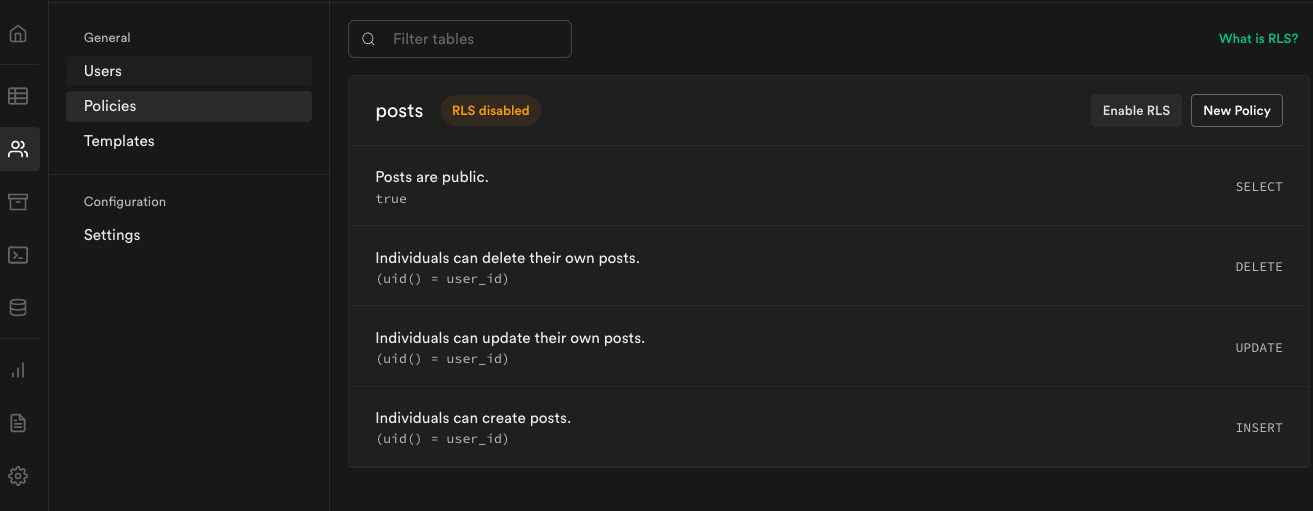
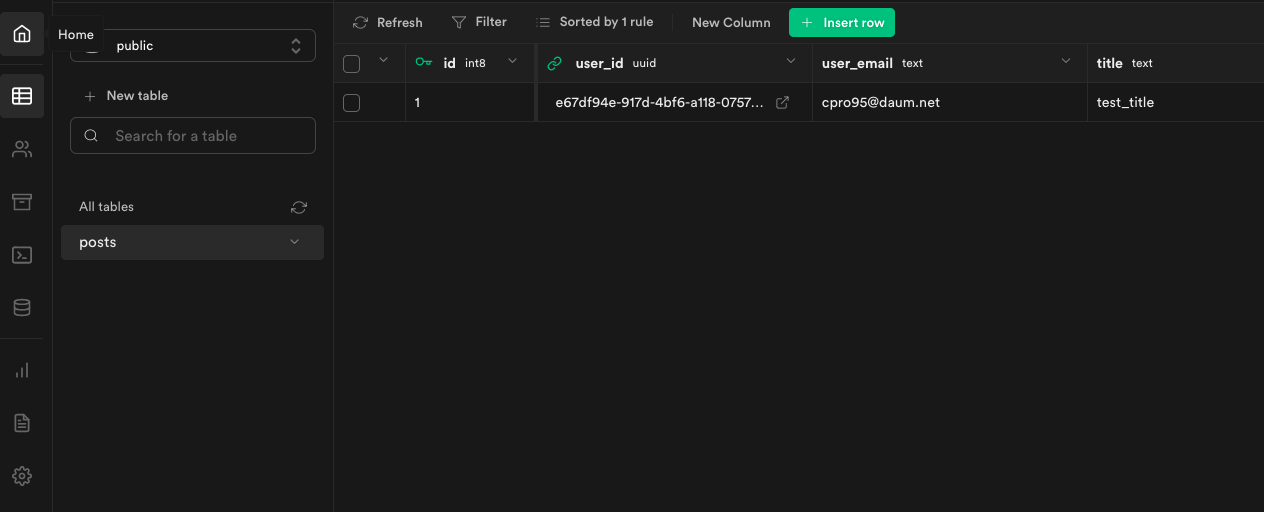
저는 임시로 더미 데이터를 넣었는데요.
옆에 + Insert row를 눌러 테스트할 데이터를 직접 입력해 보도록 하겠습니다.
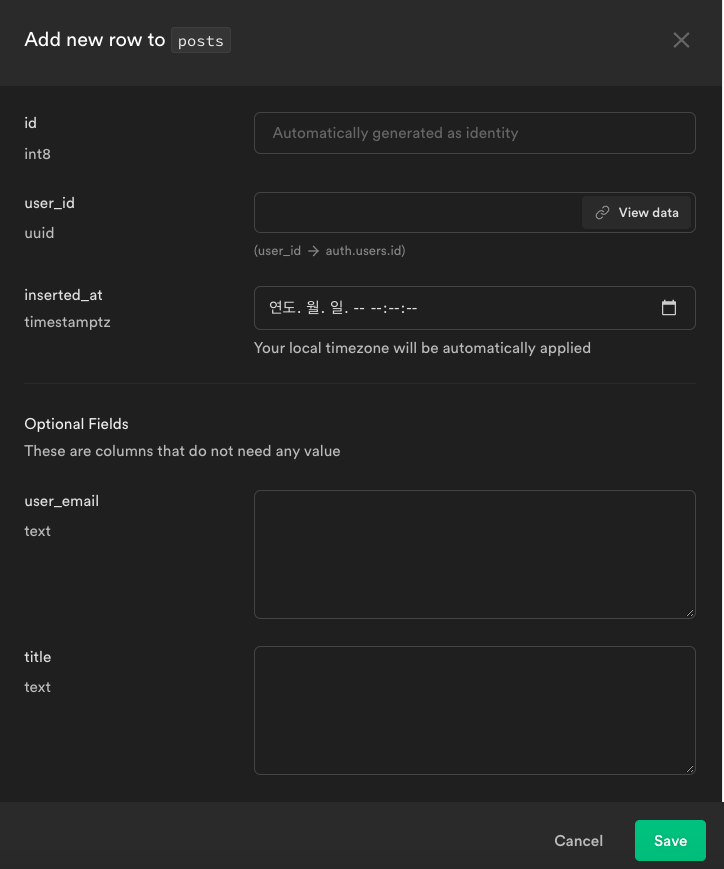
Insert Row 버튼을 누르면 위와 같이 나오는데요.
우리가 모르는 게 바로 user_id입니다.
우리가 만든 정책(Policy)에 의하면 현재 로그인된 user_id가 중요 체크사항입니다.
그래서 이 항목이 꼭 들어가야 되거든요.
그럼 user_id는 어디서 얻을 수 있을까요?
바로 대시보드 상단 Authenticaion > Users에 보시면 아래와 같이 등록되어 있는 user가 보일 겁니다.

위 그림과 같이 User UID 부분을 복사해서 붙여 넣기 하시면 됩니다.
한번 posts 테이블에 데이터를 넣어 볼까요?

정상적으로 작동되고 있네요.
이제 NextJS 코드를 작성해 보겠습니다.
posts 테이블 데이터를 불러오는 거니까 posts.tsx파일을 만들어 보겠습니다.
/pages/posts.tsx
import { useState, useEffect } from "react";
import { GetServerSideProps } from "next";
import { useMessage } from "../lib/message";
import { supabase } from "../lib/supabase";
import { User } from "@supabase/supabase-js";
import classNames from "classnames";

const PostsPage = ({ user }: { user: User }) => {
  const { messages, handleMessage } = useMessage();

  return (
    <div className="flex flex-col items-center justify-start py-4 min-h-screen">
      <h2 className="text-2xl my-4">Hello, Supabase User!</h2>
      {messages &&
        messages.map((message) => (
          <div
            className={classNames(
              "shadow-md rounded px-3 py-2 text-shadow transition-all mt-2 text-center",
              message.type === "error"
                ? "bg-red-500 text-white"
                : message.type === "success"
                ? "bg-green-300 text-gray-800"
                : "bg-gray-100 text-gray-800"
            )}
          >
            {message.message}
          </div>
        ))}

      <h3 className="py-3 font-semibold text-lg text-blue-600">Posts List</h3>
      <ul>
        {posts &&
          posts.map((post: PostsProps) => (
            <ListPosts key={post.id} post={post} />
          ))}
      </ul>
    </div>
  );
};

export default PostsPage;

export type NextAppPageUserProps = {
  props: {
    user: User;
    loggedIn: boolean;
  };
};

export type NextAppPageRedirProps = {
  redirect: {
    destination: string;
    permanent: boolean;
  };
};

export type NextAppPageServerSideProps =
  | NextAppPageUserProps
  | NextAppPageRedirProps;

export const getServerSideProps: GetServerSideProps = async ({
  req,
}): Promise<NextAppPageServerSideProps> => {
  const { user } = await supabase.auth.api.getUserByCookie(req);

  if (!user) {
    return {
      redirect: {
        destination: "/auth",
        permanent: false,
      },
    };
  }

  return {
    props: {
      user,
      loggedIn: !!user,
    },
  };
};
일단 PostsPage에서 getSeverSideProps로 user 정보를 불러오는 방식으로 로그인된 사용자만 볼 수 있는 페이지를 만들었습니다.
지난 시간의 Supabse 강좌를 참고하시길 바랍니다.
https://cpro95.tistory.com/622
Supabase로 로그인 구현하기 with NextJS 6편
안녕하세요? 이번 시간에는 Supabase로 구현한 유저 로그인 상태에 대한 보안적인 측면에 대해 알아보겠습니다. 전편 링크는 아래와 같습니다. https://cpro95.tistory.com/617 Supabase로 로그인 구현하기 wit
cpro95.tistory.com
이제 본격적으로 PostsPage 컴포넌트를 구축해 볼까요?
const PostsPage = ({ user }: { user: User }) => {
  // const { signOut } = useAuth();
  const { messages, handleMessage } = useMessage();
  const [posts, setPosts] = useState<PostsProps[]>();

  useEffect(() => {
    fetchPosts();
  }, []);

  const fetchPosts = async () => {
    let { data: posts, error } = await supabase
      .from("posts")
      .select("*")
      .order("id");
    if (error) {
      console.log(error);
      handleMessage({ message: error.message, type: "error" });
    } else setPosts(posts);
  };
useState와 useEffect를 사용해서 fetchPosts 함수를 불러오고 posts state를 설정하는 코드입니다.
supabase.from.select.order 형식의 명령어를 이용해서 클라이언트상에서 supabase 데이터베이스 자료를 불러오고 있습니다.
그리고 posts && posts.map 함수를 이용해서 화면에 그려주고 있는데요.
{posts &&
          posts.map((post: PostsProps) => (
            <ListPosts key={post.id} post={post} />
          ))}
이제 ListPosts 컴포넌트를 살표 보겠습니다.
그냥 같은 파일 안에 PostsPage 함수 선언 앞에 ListPosts 함수를 만들도록 하겠습니다.
export interface PostsProps {
  id: number;
  user_id: string;
  user_email: string;
  title: string;
  content: string;
  inserted_at: Date;
}

const ListPosts = ({ post }: { post: PostsProps }) => {
  return (
    <li>
      <div className="flex flex-wrap items-center sm:-mx-3 mt-12">
        <div className="w-full pb-6 space-y-6 lg:space-y-8 xl:space-y-9 sm:pr-5 lg:pr-0 md:pb-0">
          <h1 className="text-4xl font-extrabold tracking-tight text-gray-900 sm:text-5xl md:text-4xl lg:text-5xl xl:text-4xl">
            <span className="block xl:inline">{post.title}</span>
          </h1>
          <span className="block xl:inline">{post.content}</span>
          <span className="block xl:inline">{post.inserted_at}</span>
        </div>
        <div className="relative flex flex-col sm:flex-row sm:space-x-4 py-4">
          <a className="flex items-center w-full px-6 py-3 mb-3 text-lg text-white bg-indigo-500 rounded-md sm:mb-0 hover:bg-indigo-700 sm:w-auto">
            Read the article
            <svg
              xmlns="http://www.w3.org/2000/svg"
              className="w-5 h-5 ml-1"
              viewBox="0 0 24 24"
              fill="none"
              stroke="currentColor"
              strokeWidth="2"
              strokeLinecap="round"
              strokeLinejoin="round"
            >
              <line x1="5" y1="12" x2="19" y2="12" />
              <polyline points="12 5 19 12 12 19" />
            </svg>
          </a>
        </div>
      </div>
    </li>
  );
};
PostsProps 도 인터페이스로 선언해서 타입을 잘 전달했습니다.
이제 실행시켜 볼까요?
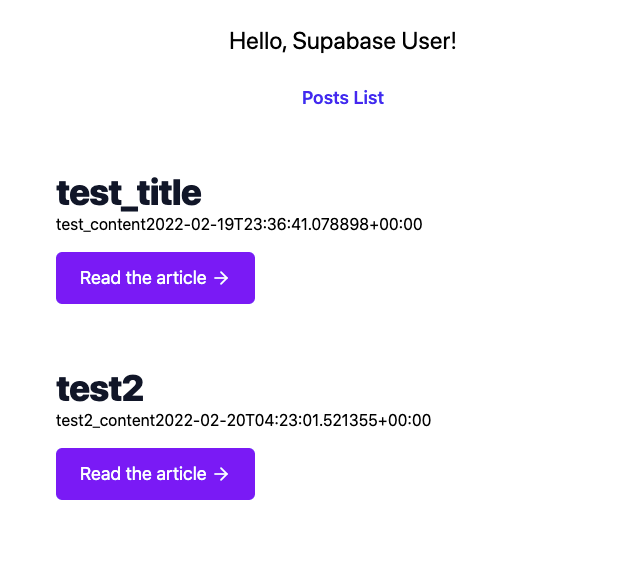
예상대로 잘 작동되고 있습니다.
이제 다음 시간에는 posts 한 개 한 개를 보여주는 화면을 만들어 보도록 하겠습니다.
그럼.
'코딩 > React' 카테고리의 다른 글
| Supabase와 PostGreSQL의 Row Level Security 살펴보기 (0) | 2022.02.20 |
|---|---|
| supabase와 NextJS로 블로그 만들기 2편 (0) | 2022.02.20 |
| 타입스크립트 React props 전달하는 방법 및 IntrinsicAttributes 오류 해결 (2) | 2022.02.20 |
| React(리액트)의 useState, useReducer 차이점 비교 (0) | 2022.02.17 |
| Supabase with NextJS 8편 - 패스워드 변경 (0) | 2022.01.24 |


